
Article: How to Measure and Fit Men's Vegan Trainers for a Snug, Slip-Free Wear

How to Measure and Fit Men's Vegan Trainers for a Snug, Slip-Free Wear
Few things spoil a walk faster than trainers that pinch at the toes or slip off the heel. With vegan trainers, that problem usually stems from fit rather than the material: even a few millimetres in length or width can change how a shoe sits, so measure both feet and try different sizes to find the right balance between toe room and heel hold.
Learn to map your foot shape and pressure points, measure length, width, and volume at home, and translate those numbers into the right size and width. Secure the fit with practical lacing techniques, a heel lock, and supportive insoles. Follow a concise try-on checklist and run simple everyday-wear tests to spot issues early, then apply targeted adjustments to prevent slipping and pinching.

How to assess foot profile and load areas for a better fit
Measure both feet for a true fit before trying on trainers or sneakers. 1. Stand on plain paper and trace each foot. 2. Mark the heel and the longest toe on each trace, then measure heel to toe for both feet. Select the fit for the larger foot to prevent pinching on the longer side. 3. Map width and toe-box shape by measuring across the ball of the foot at the metatarsal heads, and note toe alignment and whether toes need extra depth for splay or bunions. Width and internal volume affect slipping as much as length, so record these details to help you choose a size and shape that reduces movement.
Identify your arch type and pressure zones with a simple wet footprint on paper. A full imprint indicates a low arch, while a narrow connection signals a high arch. Use that result to decide whether supportive insoles or a flatter footbed will distribute pressure more evenly. Reveal dynamic pressure points by inspecting wear inside your trainers, checking insole impressions after a short walk, or observing where your foot rolls. Wear on the medial edge typically indicates pronation, and wear on the lateral edge suggests supination. Those patterns help you choose appropriate cushioning, midsole stiffness, or lacing adjustments. Measure instep and ankle circumference to assess foot volume, practise different lacing patterns, and try removable insoles to refine lockdown. Small changes to lacing height, or adding an orthotic insert, often stop heel slip and relieve hotspots without needing to change trainer size.

How to measure your foot length, width, and volume at home
Measure both feet while standing, wearing any thin liners or orthotic you plan to use with trainers. Place each foot on a sheet of paper, trace from heel to the longest toe, then measure the length in centimetres. Use the larger foot for sizing, because feet often differ and expand after activity. Capture width by marking the widest points on the tracing and measuring straight across. Record ball circumference by wrapping a soft tape measure around the forefoot; this figure helps predict side-to-side pinch. Estimate volume and instep height by running the tape over the highest point of the instep and noting heel-to-ankle circumference. A high instep or greater overall volume increases the chance of pinching in low-volume trainers, so consider styles with deeper toe boxes or more flexible uppers.
Compare your foot measurements to the trainer interior by measuring the insole length in centimetres. Account for any foot coverings and removable insoles, and leave a small clearance so the shoe neither pinches nor causes excessive heel slip. When trying trainers, test heel retention by sliding one finger behind the heel, and check for toe pinch by pressing on the toe box while standing, because static fit can change when you move. If you notice slipping or pressure, adjust lacing, swap or remove insoles, alter the thickness of foot coverings, or favour deeper toe boxes and more flexible uppers to redistribute pressure without creating new hotspots. Record the measurements and the combinations that worked so you can replicate the fit when shopping online or on the high street.

Convert your measurements to the right trainer size and width
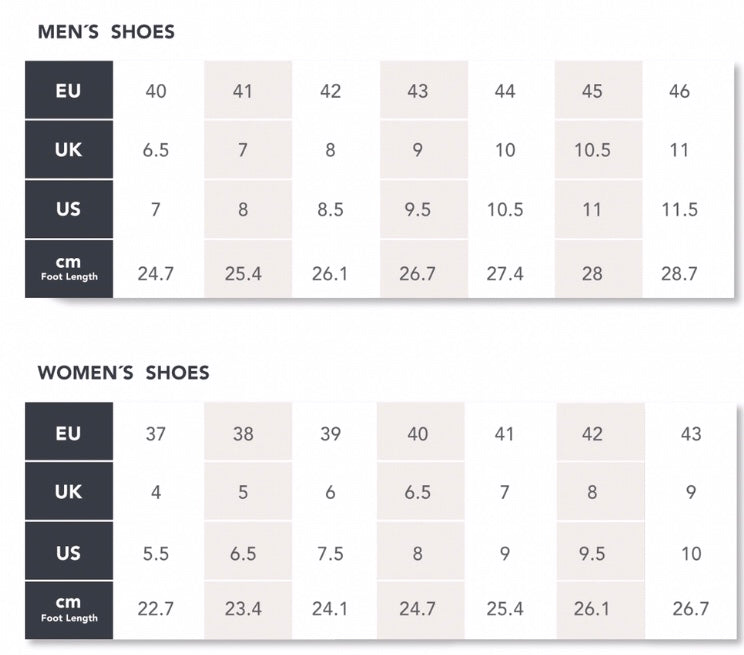
Measure both feet while standing. Place a sheet of paper on a flat surface, stand on it, and either trace each foot or use a ruler to mark the heel and the longest toe. Record the heel-to-toe length and the widest part in millimetres, and use the larger foot as your basis for sizing. Add 8 to 12 millimetres of toe allowance to the longer measurement to identify the internal length you need. Convert that corrected internal length into a trainer size by matching the millimetre figure to a length-based size chart rather than relying on nominal labels. If your measurement falls between sizes, choose the next half or full size up, because many synthetic, vegan uppers stretch less than leather. A millimetre-led approach reduces guesswork and helps you pick a size that avoids pinching at the toe while allowing natural foot movement.
Measure width and overall foot volume, as well as length. Measure the widest part of your foot in millimetres and compare that figure to retailer width categories, or remove the insole and measure the trainer's internal width. When trying trainers on, wear the foot covering you normally use, lace them as you would during activity, walk and vary your pace, then aim for about a thumb's width of space in front of your toes to avoid pinching, and no more than a finger's width of heel lift to prevent slipping. Experiment with different lacing patterns to lock the heel without creating pressure points. Record foot length, width, the thickness of your usual foot covering or liner, and any notes on instep height, bunions, or orthotics, then compare those millimetre figures to UK, EU, and US charts to pinpoint whether fit issues come from length, width, or overall shoe volume.
Practical checklist for measuring, buying, and fixing trainer fit
- Measure both feet while standing: have a ruler or tape, trace or mark heel and longest toe, record heel-to-toe length and widest part in millimetres, use the larger foot as your basis, and add 8 to 12 millimetres of toe allowance to the longer measurement to identify the internal length you need.
- Check width and volume: measure the widest point in millimetres, remove the insole to check a trainer's internal width if possible, wear the socks you will use, lace the trainers as for activity, and walk at varied paces aiming for about a thumb's-width of front toe space and no more than a finger's-width of heel lift.
- If a measured size still feels wrong, try these fixes: go up a half or full size for toe-box squeeze, choose a wider width or a roomier last for narrow problems, experiment with lacing patterns to lock the heel without pressure, and use thin or moulded insoles or orthotics to adjust volume and support.
- When shopping, convert the corrected internal length in millimetres to UK, EU, and US sizes using a length-based size chart, compare your width millimetres to retailer width categories, favour the next half or full size up if you fall between sizes because synthetic uppers often stretch less than leather, and record your measurements, sock thickness, and fit notes to compare across brands and ease returns.

Secure your sneaker fit with lacing, heel lock, and supportive insoles
Choose a lacing pattern to redistribute pressure across your sneakers. Use a heel lock by threading the lace back through the top eyelets to pin the heel in place. Skip or use parallel lacing to relieve forefoot pressure. Try window lacing to move contact away from bunion points. Each pattern redirects forces on the upper: a heel lock increases collar tension to prevent lift, skipped eyelets reduce instep squeeze, and windowing creates a pressure-free zone over a sensitive spot. While lacing, centre the tongue and smooth any folds. Preload the heel so the collar cups the Achilles tendon, and place a thin pad where gaps need filling without pushing the forefoot up. Check for heel lift from a shallow heel counter and address that before adding insoles.
Start by removing the factory liner to confirm internal space. Select an insole that matches your arch height and overall foot volume, trim it to the outline of the original liner, and replace it so you do not reduce toe-box width or length. Check fit on a firm surface: stand and measure from heel to longest toe, allowing a thumb's breadth of extra room at the front. Put on the pair you will wear with the trainers and walk indoors, watching for heel lift greater than a finger's width or any pinch across the forefoot. Adjust for upper behaviour, since knitted uppers tend to conform and stretch and may need tighter lacing, while synthetic leathers hold their shape and often benefit from supportive insoles. Try quick fixes such as thin tongue pads, heel grips, or a runner's knot at the top eyelets, and repeat adjustments until the trainer secures the heel without compressing the toes.

Perfect your fit: try-on checklist and everyday wear tests
Measure both feet while standing, wearing the insoles or orthotics you plan to use. Trace each foot on a flat surface, then measure from the heel to the longest toe in centimetres and compare that length with the shoe's internal measurement. Allow about 10 to 12 mm of extra space from the longest toe to the shoe tip to permit natural toe splay during push-off; cramped toes increase pressure, alter gait, and cause pinching and blisters. When trying trainers on, lace them as you would for activity, stand, walk, and perform short bursts, quick turns, and stair climbs. Test both shoes, and when sizes differ, favour the fit of the larger foot.
Measure heel slip with the shoe laced. Two practical checks work well: have someone pinch the back of the heel cup while you lift your foot slightly, or mark the insole and walk to observe any visible lift. Aim for movement under about 1 centimetre; more suggests a different last, stronger lacing, or a thin heel insert to prevent rubbing and hotspots. Before returning the shoes, try simple in-shoe adjustments: adopt a heel-lock lacing pattern, swap insoles to alter internal volume, or add thin heel liners or metatarsal pads. Re-test after each change on varied surfaces, because many vegan materials feel stiffer initially and may not mould to the foot like leather. Finally, run a short everyday-wear trial that mirrors your typical activity. Inspect your feet immediately afterwards for red marks, numbness, early blisters, or persistent hotspots, and note whether your toes splay naturally at toe-off. If problems appear quickly, choose a different size, width, or last rather than relying on a long break-in period.
A correct fit, not the vegan upper, prevents heel slip and toe pinch. Identify your foot's contours and principal contact areas, then measure length, width, and volume, sizing to the larger foot. Convert those millimetre measurements to the trainer's internal length, leaving 8 to 12 millimetres of toe allowance. Check the trainer's internal width and volume, and fine-tune the lockdown by adjusting the laces to secure the heel and adding cushioned insoles for extra support.
Follow the try-on checklist: trace both feet while wearing the liners or orthotic you plan to wear with the trainers, walk at varying paces, and use objective cues such as a thumb's width of toe room and under one centimetre of heel lift. Record measurements, successful lacing patterns, and insole choices, then run short wear tests and iterate until the combination leaves no red marks, numbness, or hotspots. With those results, select trainers confidently, whether on the high street or online.
FAQ
What measurements should I take at home to ensure trainers fit properly?
Measure both feet while standing with the socks or orthotic you will use: trace heel to longest toe in centimetres, mark the widest point and measure across, record ball girth with a soft tape, and note instep and heel-to-ankle circumference to estimate volume; use the larger foot for sizing.
How do I convert my foot measurements into the correct trainer size and width?
Add about 8 to 12 millimetres of toe allowance to the longer foot measurement to get the internal length you need, match that millimetre figure to a length-based size chart, and compare your widest measurement to retailer width categories or the trainer's internal width (remove the insole if possible); if between sizes, choose the next half or full size up because many synthetic uppers stretch less than leather.
Why do vegan trainers slip at the heel or pinch at the toes, and how can I fix this without changing size?
Heel slip and toe pinch usually come from incorrect volume, width, or lacing rather than the material; try different lacing patterns and a heel-lock, swap or trim insoles, add thin heel grips or tongue pads, adjust sock thickness, or choose styles with deeper toe boxes or more flexible uppers to redistribute pressure.
When trying trainers on, what tests should I perform to spot fit problems early?
Wear the socks and orthotics you intend to use, lace as for activity, stand and walk with short bursts, turns, and stair climbs, aim for roughly a thumb's-width of toe room and under one centimetre of heel lift, and inspect your feet after a short wear for red marks, numbness, or hotspots.
Can arch type and pressure patterns influence which trainers will suit me?
Yes; use a wet print to identify low or high arches and check sock or insole wear for pronation or supination, then choose supportive insoles, a flatter footbed, different midsole stiffness, or specific lacing adjustments to redistribute pressure and improve comfort.