
10 Questions to Ensure Fit, Cushioning, and Stability When Buying Vegan Trainers
Bought vegan trainers that looked great but left you with blisters, aching arches, or unstable steps? These ten questions probe fit, cushioning, and stability, revealing how foot shape, gait, midsole response, and outsole grip determine comfort, efficiency, and longevity.
Learn to match trainers to your training type and typical surfaces, check size and width, ensure a secure heel lock, and evaluate arch support and lateral stability. The checklist also guides you to compare midsole cushioning and responsiveness, check heel-to-toe drop, inspect outsole durability and traction, and test trainers on the move to plan break-in and maintenance.

1. Identify your training type and the surfaces you train on
List your primary training types, such as road runs, trail runs, gym sessions, and court sports, and note the surfaces you use. Tally how often you do each so you can prioritise cushioning, stability, or traction based on actual use. Hard surfaces send more shock through the foot and leg, so regular long runs on pavement tend to benefit from a thicker midsole to reduce peak impact. Softer, uneven terrain lowers peak forces but increases the need for underfoot protection. Match movement patterns to platform properties: activities with rapid direction changes, like court drills or agility work, need a lower, firmer platform and strong torsional control to resist sideways forces, while straight-line endurance sessions tolerate more compressible cushioning and a slightly higher stack height. Use your activity tally to decide which features matter most for your trainers or sneakers.
Inspect outsole tread and toe-box details for surface-specific needs. Deeper lugs and a protective midsole plate boost grip and puncture resistance on trails, while a flatter, grippier compound performs better on studio floors. When trying trainers, use the same insoles and liners you normally wear, and replicate a shortened version of your typical session to assess heel hold, forefoot comfort, and overall stability. If you run or train across mixed surfaces, rotate pairs or test a hybrid design that balances cushioning, control, and traction, so your footwear reflects how you actually use it.
Try a responsive, cushioned trainer for mixed-surface speed.

2. Assess foot shape, arch height, and gait for a better fit
Measure both feet, because most people have one foot slightly larger. Trace each foot on a piece of paper or measure length and width with a ruler, and base your sizing on the larger foot to avoid chronic pressure points. Check arch height with a quick wet-print test: wet your sole, stand on plain paper, and step off. A broad, filled-in imprint usually means a low arch and a tendency to pronate; a thin, boat-shaped imprint suggests a high arch and reduced natural shock absorption. If you prefer a hands-on check, locate the bony bump along the inside of your foot (the navicular); while standing, note how high it sits above the floor — lower equals a lower arch, higher suggests a higher arch. Translate those findings into functional choices: low arches often benefit from trainers with stability or motion-control features and firmer midsole support, while high arches usually need extra cushioning and flexible midsoles to improve shock absorption. Neutral arches do well with balanced cushioning and support. Finally, review wear patterns on your old shoes to confirm your assessment: inner-edge wear indicates pronation, outer-edge wear points to supination, and even wear suggests a neutral gait. Use these combined clues when choosing sneakers or high tops to get a fit and function that match how your feet actually move.
Film a short video from behind while you walk or run, or inspect outsole wear to identify gait patterns. Inside-edge wear, or an inward roll, indicates overpronation; outside-edge wear, or an outward roll, suggests supination; even wear points to a neutral gait. Try trainers with the footwear or liners you normally use. Walk and jog in a straight line, and around corners, to check heel slippage, midfoot lockdown, and forefoot comfort, aiming for about a thumb's width of space in front of the longest toe and no pinching across the forefoot. Remove the factory insole to test orthotic compatibility, and confirm the shoe retains heel stability and midfoot support both with and without an insert.
Wear cushioned socks to improve fit and reduce hotspots

3. Check size and width to ensure a true fit
Measure both feet while standing. Either trace each foot onto paper, or stand on a ruler, and record two measurements for each foot: heel-to-toe length, and the widest point. Use the larger measurements when consulting a retailer’s size chart for both size and width. Try the trainers with the hosiery or insoles you normally wear, and walk for a few minutes so your feet can expand naturally; real movement reveals forefoot tightness or excess heel volume. With weight on the foot, aim for about 1 centimetre of space from the longest toe to the front of the shoe, and press down on the forefoot to confirm the toes can spread naturally.
Test heel lockdown by walking and jogging in your trainers to spot any heel lift. Adjust the tongue and try a heel-lock lacing pattern to reduce slippage, and check for a gap behind the heel that could cause rubbing. Confirm insoles are removable if you use orthotics, and opt for a wider fit if you feel pressure across the midfoot. Pay attention to how the upper material behaves: woven textiles usually mould faster than stiff synthetic leather, so expect fit to change with wear. Together, these checks help you match size, cushioning, and stability to your foot shape and support needs.
Wear soft joggers when testing shoes on the move.

4. Check heel-lock fit and toe-box room in your sneakers
Allow about a thumb's width, roughly 1 to 1.5 centimetres, between your longest toe and the shoe tip when standing. Shift your weight forward to check that toes can splay naturally and to feel for any contact. Try trainers on both feet wearing any insoles or liners you plan to train in, and repeat the fit checks after a short walk, because feet often differ in length and swell with activity. Fit the larger foot, and judge comfort after movement rather than while seated.
Assess heel lock by lacing the trainer, walking a short loop, then measuring heel slip. If the rear of your foot moves back more than 1 centimetre, the lock is inadequate — this reduces control and increases the risk of blisters. If you detect slip, try a locking lacing technique, re-lace with a runner's loop, or test a different size or last to improve rear-foot control. Remove the insole to check internal volume and confirm orthotic compatibility; placing your own insert reveals whether the toe-box depth and upper can accommodate added support. Look for pressure marks, hot spots, or creasing over the toes as signs of tightness, and note that a floppy heel counter or blisters behind the heel indicate insufficient rear control.
Choose a breathable, cushioned trainer with secure tubular lacing.

5. Check arch support and lateral stability in your trainers
Identify your arch shape using a simple wet test or by checking wear patterns on your sole. Wet your foot, step onto a piece of card or paper, and look at the imprint: a full imprint indicates a low arch, a narrow connection indicates a high arch, and a moderate imprint indicates a neutral arch. Alternatively, wear on the inner edge of the sole usually shows inward roll (overpronation), and wear on the outer edge suggests underpronation (supination). Match support to your arch and to the activity. For high arches, favour a contoured footbed that supports the arch. For low arches, choose a trainer with a stable midsole. For neutral arches, look for a design with neutral flexibility that allows a natural gait. If you use orthoses, ensure the trainer has a removable insole and a cavity deep enough to accommodate them without changing the fit. For cutting and court sports, or if you notice inward roll and inner-sole wear, pick trainers with firmer lateral stability and stronger medial control. For long-distance walking, favour more flexible, neutral designs that reduce fatigue. Treat numbness, persistent ache, or rapid sole deformity as signs that your footwear may not be providing adequate support, and seek professional assessment if those symptoms persist.
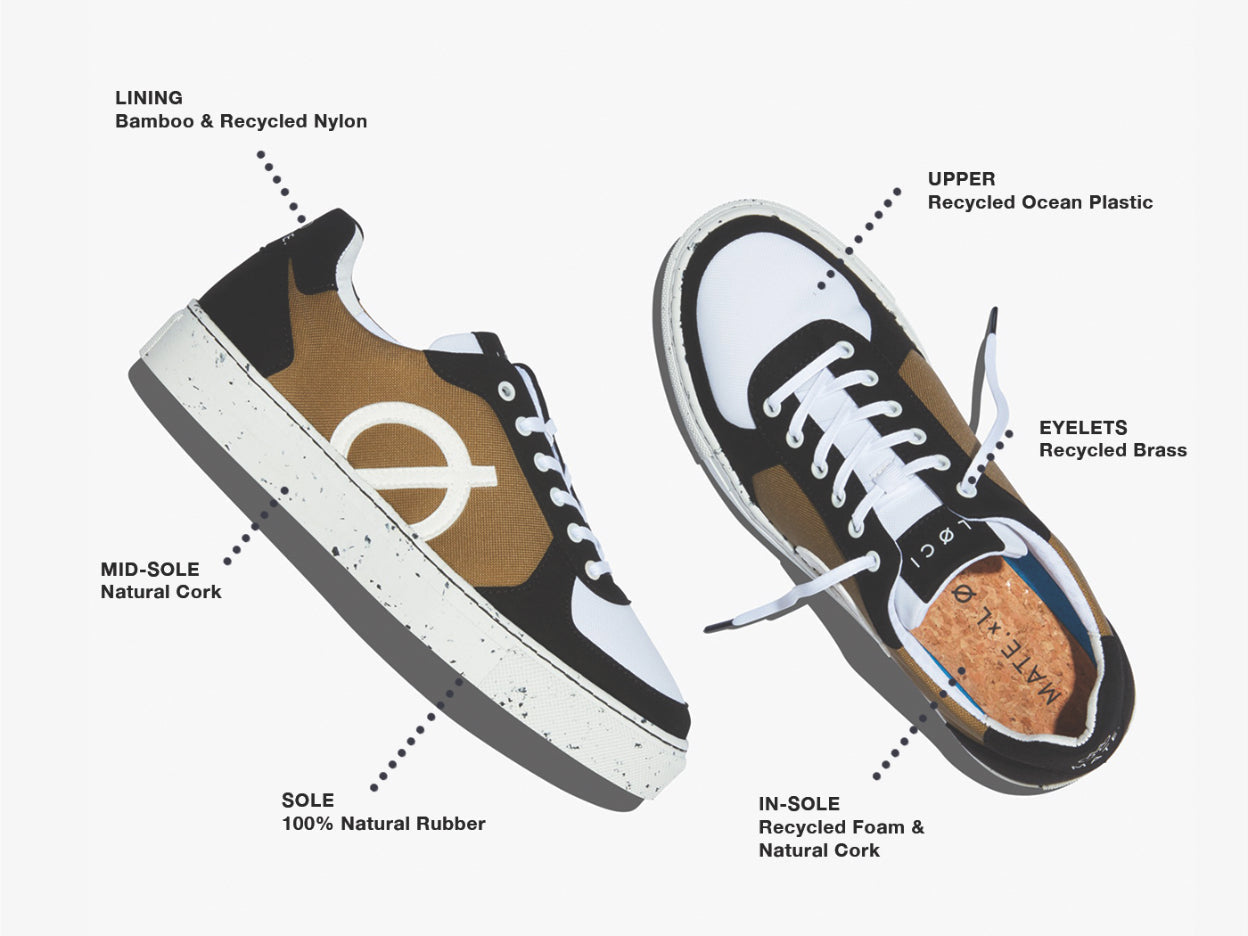
Use simple in-store tests to reveal a sneaker's lateral stability. Stand on one foot inside the trainer; your arch should hold the foot steady. Do a few quick lateral shuffles to feel for roll or collapse. Twist the sneaker along its length to check torsional rigidity, the shoe's resistance to twisting. Inspect construction details that boost stability: a firm, moulded heel counter, a midsole geometry that is centred or slightly medially biased for pronation control, a visible shank or reinforced midfoot to transfer load, and a slightly flared outsole to widen the base of support. Consider how vegan materials affect support and longevity. Denser plant-based or synthetic foams retain height and rebound better than softer, low-density foams, and cork or thermoplastic reinforcements can add structure without animal materials. Look for early midsole compression, uneven sole wear, or new discomfort as evidence that support is degrading. Use those signs, alongside fit and feel, to compare models.
Wear cushioned socks to improve fit and reduce friction.

6. Compare midsole cushioning and responsiveness for comfort and energy return
When assessing a trainer's midsole, focus on three things: foam density, energy return, and compression set. Laboratory rebound figures often predict a snappier feel, while lower-density foams usually feel softer but show faster compression over time. To try this at home or in store, press the heel and forefoot firmly with your thumb, release, and watch how quickly the foam rebounds. Then take a few brisk steps or a short jog in each model to sense spring, transition, and stability. Comparing two pairs back to back lets you weigh short-term plushness against likely long-term resilience, based on how the foam performs initially and after repeated compressions.
Stack height, heel-to-toe drop, and midsole geometry shape how a trainer cushions and responds. A higher stack adds vertical padding but usually reduces ground feedback, while a lower drop and thinner midsole generally feel livelier and more stable during quick changes of direction. Look for durability clues such as creasing, permanently flattened areas, or loss of rebound, and check whether the insole is removable so you can replace it if cushioning degrades. Bear in mind that some modern foams trade long-term rebound for an initially plush ride, so prioritise the attribute that matches how you will use the shoes. Match foam firmness to your biomechanics: denser, firmer midsoles and built-in stabilising elements suit heavier runners or those who need support, whereas lighter, high-rebound foams favour tempo work and shorter runs. Test using your usual gait and running conditions to draw your own conclusion.
Read

7. Assess heel-to-toe drop and impact control in trainers
To measure heel to toe drop in millimetres, measure the stack height under the heel and under the forefoot, then subtract the forefoot measurement from the heel measurement. Alternatively, check the trainer or sneaker technical specification and use that figure when comparing models. Drop alters where and how your foot contacts the ground, so walk and jog a few strides in the shop and note whether your first contact is heel, midfoot, or forefoot. Notice where you feel impact, in the knees, calves, and Achilles, as that sensation indicates how a given drop will affect your gait.
Press the midsole with your thumb to assess foam firmness and rebound. Combine that tactile check with the trainer's drop number to predict impact attenuation and overall ride feel. Test stability by standing on one leg, stepping down from a low kerb, and walking along an uneven high street to see whether a lower drop demands more ankle control or a higher drop shifts load toward the knee. If you switch to a different drop, alternate the new trainers with familiar footwear, increase wear gradually, monitor for calf, Achilles, or knee pain, and consult a healthcare professional if discomfort persists.
Wear relaxed sweats after runs to aid recovery.

8. Test outsole traction and long-term durability on trainers
Start by inspecting the tread pattern and depth on the trainer sole. Look for multi-directional lugs and fine siping; these channels move water away and improve lateral grip. Widely spaced lugs help shed mud, and noticeably deeper grooves mark the zones where grip matters most. Press the tread with your thumb, then walk the trainer across a smooth shop floor to feel how the rubber actually grips. Examine the rubber compound you can see and feel. Softer compounds usually stick better on wet, smooth surfaces, but they abrade faster. Harder or carbonised rubbers resist wear in the heel and forefoot. Denser, darker patches often signal deliberate reinforcement. These visual and tactile cues let you compare likely wet-weather performance against probable longevity without relying on labels.
Check sole construction for delamination by inspecting glue lines and the junction between outsole and midsole. Look to see whether the outsole is stitched or wraps up the sides, which helps secure the bond, and gently flex the trainer to reveal any early separation. In-store, simulate real use: walk briskly over a few floor surfaces, flex the forefoot to watch for tread compression, press the heel to mimic impact, and rotate the trainer slightly to detect lateral bite, uneven contact, or slipping. Seek visible reinforcement at the heel and toe, generous tread depth, and mud-shedding tread geometry as signs of durability, and favour designs that accept rotation or resoling to extend service life. Keep longevity practical: clear trapped debris regularly to preserve traction, and inspect high-wear zones so you can plan maintenance before performance deteriorates.
Stay comfortable while testing shoes in-store

9. Assess trainers' materials for breathability and moisture control
Vegan uppers differ in porosity. Open-knit and engineered mesh fabrics have larger pores that allow convective airflow and faster evaporative cooling, while coated textiles and waterproof membranes block air and tend to trap vapour. When choosing sneakers, trainers, or high tops, check composition lists and product images, and favour open-weave constructions for high-intensity activity, or denser, coated fabrics when you need weather protection and durability. Recycled or coated materials often alter porosity compared with virgin textiles, so read descriptions closely and look for breathability information where available.
Choose trainers with deliberate ventilation: perforations, mesh panels, laser-cut vents, and foam midsoles with channelled airflow. Multiple openings dry and cool faster than a single small vent. Look for wickable linings, quick-dry foams, and removable insoles that pull sweat away from the foot and let you air or replace footbeds to control moisture and odour. At home, hold the upper to a light to check porosity, press a fingertip against mesh to feel airflow, and drop a bead of water on the surface to see whether it beads or absorbs. After use, remove insoles to dry, rotate pairs where possible, and pair trainers with moisture-wicking liners or breathable footliners to reduce internal humidity and lower blister risk.
Change into relaxed fleece for quick post-activity cooling.

10. Test your trainers during use: plan break-in and care
Put the trainers on with the same foot covering you plan to use, then walk, jog, and change direction. Run a few short bouts, make sharp turns, and tackle brief inclines to reveal heel slip, limited forefoot room, or hotspots that only show up on the move. Break them in gradually: start with short spells of wear, increase duration only if no rubbing develops, and alternate with another pair to reduce repetitive stress. Try lacing adjustments or swap insoles to redistribute pressure before it becomes a blister. These practical checks let you spot slipping, pinching, or instability early, so you can adjust before committing to longer sessions.
Care for vegan uppers and midsoles with a soft brush and a mild detergent. Do not machine wash or expose trainers to direct heat. Remove insoles and air-dry in a cool, ventilated place to help preserve shape and prevent odour. Check cushioning and stability with simple, repeatable tests rather than relying on feel alone. Press the midsole and compare how quickly it rebounds; a noticeably slower rebound or a permanently compressed feel suggests cushioning has lost protective function. Photograph the outsole at intervals to track wear patterns, looking for uneven wear across the heel or forefoot, thinning treads, or new flat spots. Watch for any new instability during lateral moves, increased heel slip, or changes in how the trainer sits on your foot. Extend performance by rotating trainers between sessions, replacing or washing insoles, and experimenting with lacing patterns to improve hold. Treat stains promptly to avoid long-term material damage, and consult a cobbler for sole reattachment or professional repairs if you see structural issues such as sole separation, delamination, or deep midsole compression.
Use these ten questions as a practical checklist linking your training patterns, foot shape, and typical surfaces to the design elements that determine fit, cushioning, and stability. Carry out simple in-store and at-home tests, such as timing midsole rebound using your thumb, filming your gait to reveal pronation, and walking across different surfaces in your usual trainers, to assess heel lock, arch support, and outsole grip that indicate likely comfort and durability.
Treat the headings as a step-by-step routine: identify your training type, measure and test the fit, compare midsole response and drop, and inspect the outsole and materials. Choose shoes based on observed performance rather than marketing claims. Perform these checks wearing the footwear setup you typically train in, including any insoles. Increase wear gradually, and monitor wear patterns so you can address fit or durability issues early and keep your trainers performing when it matters.